
When a drain keeps backing up weeks after it was cleared, the problem is rarely the clog that got pulled out. It is usually something the clearing never touched: a crack in the pipe wall, a section that has sagged below its slope, or roots that grew back through a joint. A traditional physical drain inspection works by feel, not sight: a snake reaches resistance and stops, which confirms that a blockage exists and roughly where, but the tool cannot tell the technician whether it hit grease, a root mass, or a broken pipe wall. The difference between a physical inspection and a video drain inspection is the difference between confirming a problem and seeing it.
A video drain inspection sends a waterproof camera through the line and puts the pipe interior on a live screen, so the cause, the condition, and the exact location are visible instead of inferred. On the Delmarva Peninsula, a high water table and shifting coastal soil push older lines toward the exact failures a camera catches: joints that pull apart, runs that settle into low spots, groundwater finding its way in. That is where seeing the pipe rather than guessing at it decides whether a repair is targeted or exploratory. This guide covers what the camera reveals that a physical inspection cannot, why local ground conditions raise the stakes, and when the inspection is worth running.
How Does a Video Drain Inspection Work?
A technician feeds a waterproof camera on a flexible rod through a cleanout into the drain line and watches the pipe interior on a live monitor, while an on-screen distance counter and an above-ground sonde locator mark the exact position and depth of anything the camera finds. The head sits at the tip of a push rod. That rod has to be stiff enough to drive through a bend but thin enough to pass a residential lateral, and a ring of LED lighting around the lens keeps the feed bright inside a pipe that has no light of its own.
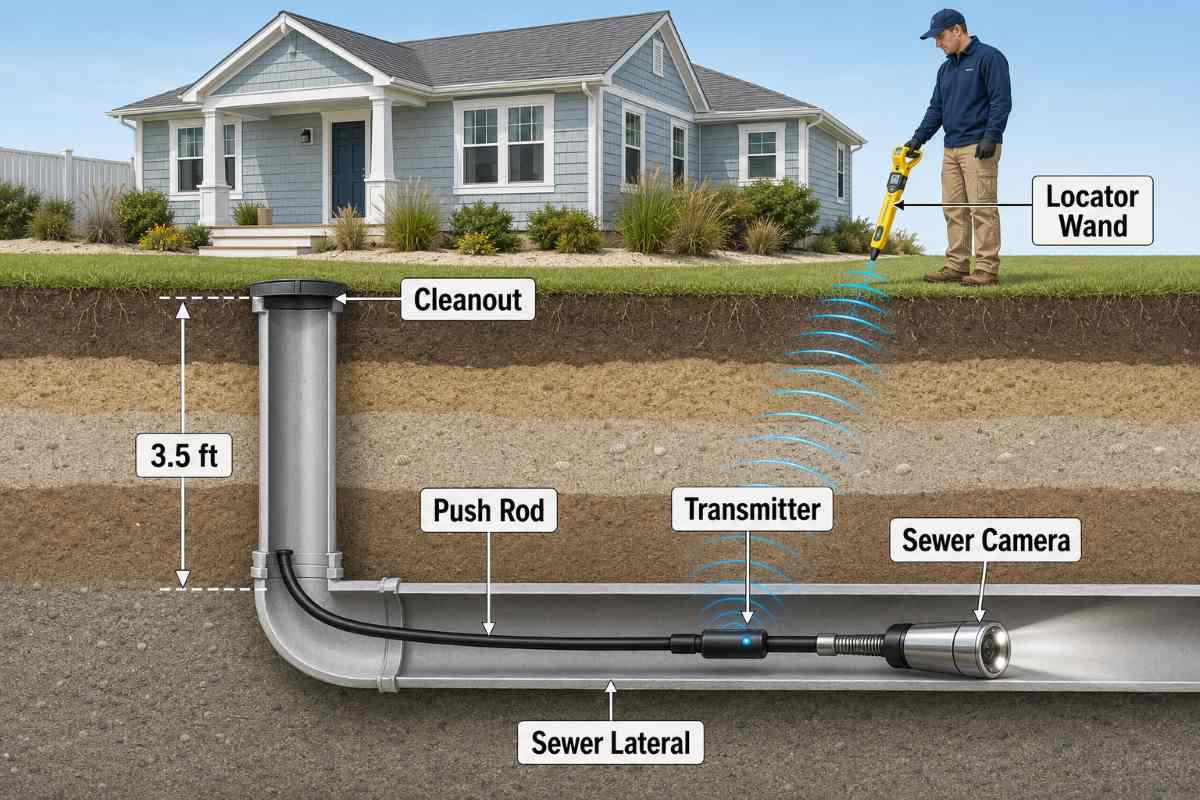
So the technician is not standing in the yard, reading a cause from how the water backs up or where a snake happened to stop. The wall, the joints, the blockage all show on the monitor as the head travels. Nothing is inferred.
Seeing the defect is only half of it. The camera cannot tell you where it sits or how deep, and that is what the distance counter and the sonde locator are for.
The counter tracks how far the rod has fed into the line and puts that footage on the screen, so a crack well down the lateral gets logged at its real distance instead of “somewhere past the cleanout.” Behind the head sits the sonde, a small transmitter that pushes a signal up through the soil to a locator wand the technician sweeps across the yard. That fixes both the spot and the burial depth within inches. Depth is the number that decides whether the repair is a targeted dig over one marked spot or a trench chasing the whole line.
What Can a Physical Drain Inspection Detect, and Where Does It Stop?
A physical inspection confirms that a blockage exists and roughly where a snake meets resistance, and pressure or dye tests can confirm a leak is present, but none of these methods show the cause, the pipe’s condition, or the precise location, so the diagnosis stays an inference. Snaking and augering are the most common physical methods. A cable with a cutting or grabbing head is driven down the line until it hits something, clears it, or stalls.
That tells the technician two things: a clog is present, and it sits somewhere in the zone where the cable met resistance. What it does not tell anyone is what the cable hit. Grease, a root mass, and a broken pipe wall all stop a snake, and the snake reports the same resistance for each. Clearing the surface of that obstruction restores flow for a while, but if the cause is structural, the snake did nothing to it, and the line backs up again.
Pressure and tracer tests answer a different question. Only that. A dye test flushes colored water through the system to see where it surfaces, a smoke test pushes non-toxic smoke into the line to find where it escapes, and a hydrostatic test seals a section and fills it with water to see whether the level holds.
Each of these confirms one fact: a leak or a cross-connection exists. None of them shows the entry point on the pipe wall, the severity of the defect, or the condition of the surrounding pipe. A hydrostatic test can tell you the under-slab line loses water; it cannot tell you the crack is a hairline or a full separation.
Symptom-based diagnosis is where the guessing compounds. Recurring backups, whole-house slow drainage, and sewer odors get read as evidence, matched to a likely cause, and treated on that assumption. A home inspector running the fixtures sees the water disappear and moves on, because the visual fixture inspection stops at the drain. The result is a line that gets snaked on a schedule, cleared every few months, and never diagnosed, while the actual defect, a bellied section or a root intrusion at a joint, sits untouched underground and keeps producing the same symptom.
What Does Video Inspection Reveal That Physical Methods Miss?
A camera exposes three things a physical inspection cannot: structural damage in the pipe wall and joints, bellied sections that sag and hold water, and tree roots that re-enter after every clearing. Each one is covered below.
What Structural Damage Can a Sewer Camera Find?
A camera shows cracks, fractures, offset or separated joints, and partial or full collapse directly on the pipe wall, defects a snake passes through or stops at without ever identifying. Each has a distinct visual signature the technician reads off the live feed:
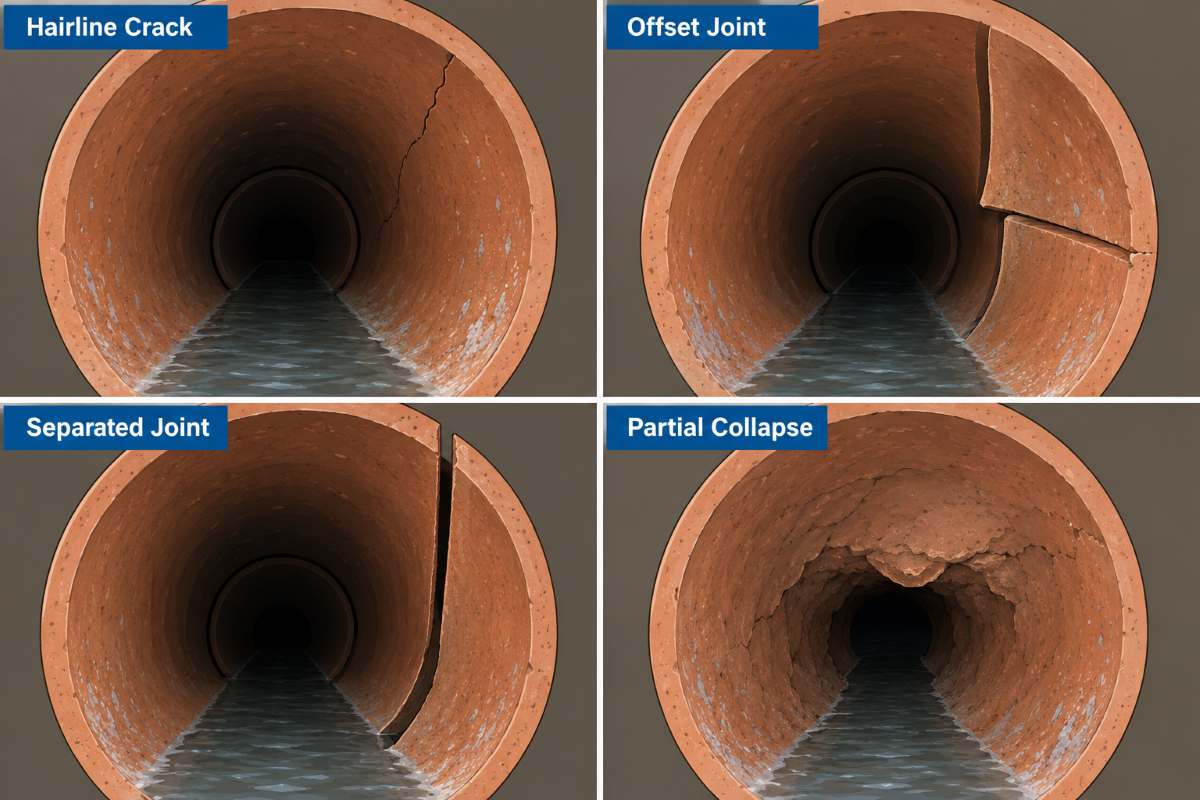
- Crack: a thin line along the pipe wall, often hairline at first, that widens and lets soil and groundwater seep in.
- Fracture: a break where the wall has split into pieces that still hold their position but no longer seal.
- Offset joint: two pipe sections that have shifted out of alignment, so one edge sits proud of the next and catches debris.
- Separated joint: two sections that have pulled fully apart, leaving a gap where waste escapes and roots and soil enter.
- Partial collapse: a section where the wall has caved inward, narrowing the channel and trapping flow behind it.
- Full collapse: a section that has failed completely and blocked the line, ending any chance of clearing it by cable.
A snake meets these defects blind. It slides past a crack or a widening joint without registering anything, and at a collapse it simply stops, the same stop it makes at a grease plug. That is why a cleared line with a structural defect keeps failing: the cable restored flow through the debris, but the crack, the offset, or the caved wall is still there, still admitting soil, still catching the next round of solids.
How Does a Camera Detect a Bellied or Sagging Sewer Line?
A belly is a sagging section of pipe that has dropped below its intended slope and holds standing water and solids instead of draining them. The camera shows it directly: the technician watches the feed reach a stretch where water stops moving and pools, and the pipe floor falls away from the steady downward grade it should hold. A snake never finds it. The cable slides straight through the low spot without resistance and reports nothing wrong.
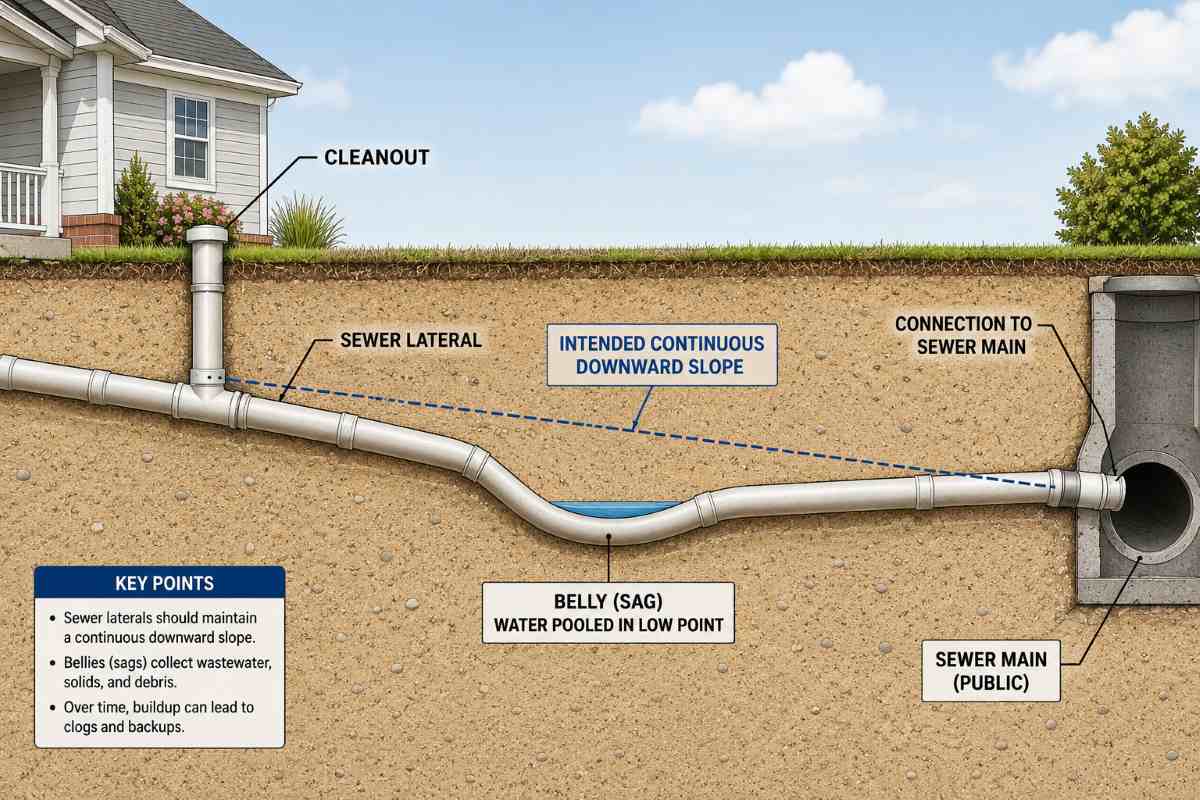
That is why a bellied line snakes clear and backs up anyway. Water and waste collect in the sag, the standing water breeds buildup, and the backups return on a cycle no clearing can break, because the low spot refills the moment the line is used. The distinction matters for the repair, not just the diagnosis. A clog gets cleared; a belly gets dug up. Correcting it means excavating the sagging run and re-grading the pipe to restore fall, which is why identifying a belly on camera before any work starts is what keeps a homeowner from paying to snake the same line four times a year.
What Can a Camera Tell You About Tree Root Intrusion?
A camera shows roots entering the pipe through a joint or a crack, how far they have spread down the line, and whether they have grown back since the last clearing. That last point is what a snake can never answer. A cable shreds the roots it can reach and pulls out a tangle, which looks like a fix, but it leaves the entry point in the pipe wall untouched. On the feed, the technician sees the actual doorway, the open joint or fracture where the root came through, not just the mass it left behind.
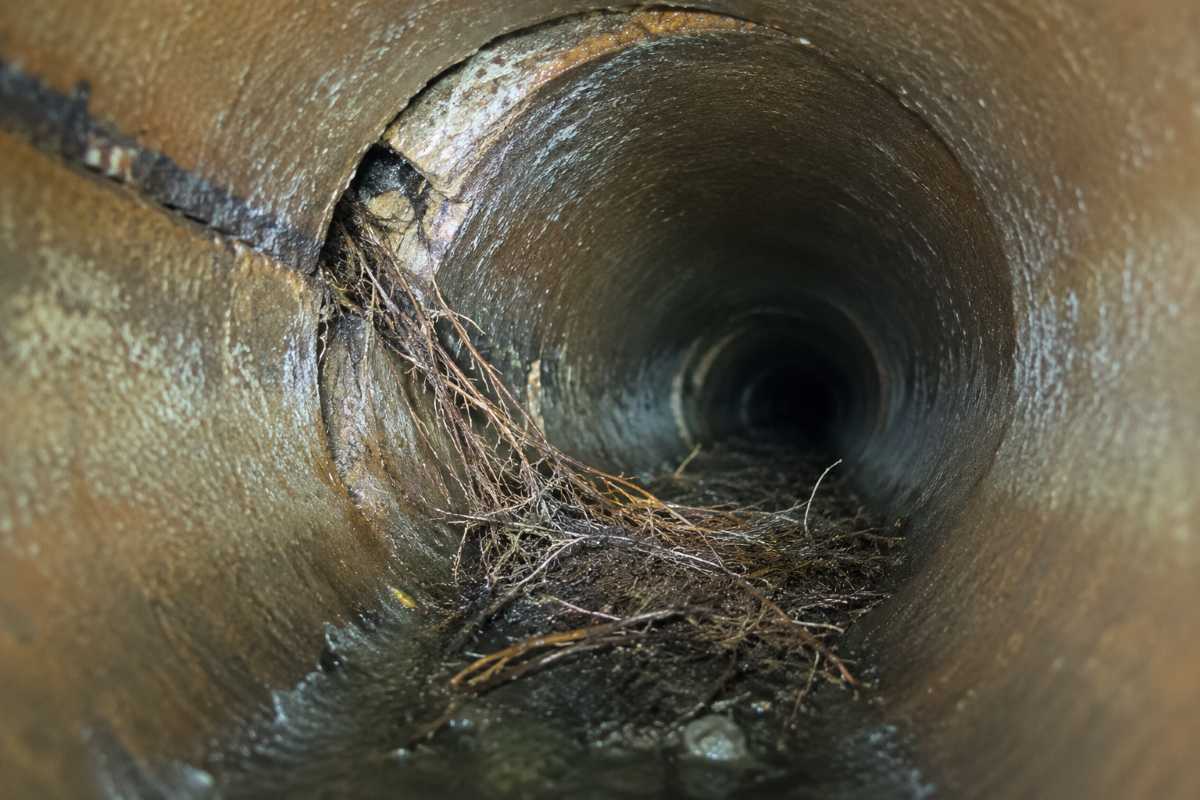
Roots return because the opening stays open. The fine root hairs regrow through the same gap within weeks, drawn to the water and nutrients inside the line, and the backup comes back on the same schedule as before. What the camera reads decides the repair. A few roots at one clean joint may need only cutting and a spot liner; a length of pipe cracked open along a root run needs lining or replacement, not another clearing. On the Delmarva Peninsula, where mature trees sit over older jointed laterals, this is the single most common reason a line keeps re-clogging no matter how many times it is snaked.
How a Camera Identifies Your Pipe Material and Its Condition
A camera identifies whether a line is clay, cast iron, Orangeburg, or PVC by its wall texture and joint pattern, and it shows the corrosion, scale, and diameter loss that reveal how much service life is left, information a physical inspection never surfaces. What the pipe is made of tells the technician how it is likely to fail and roughly when, which is why material identification changes the whole repair conversation for an older Ocean City or Salisbury property.
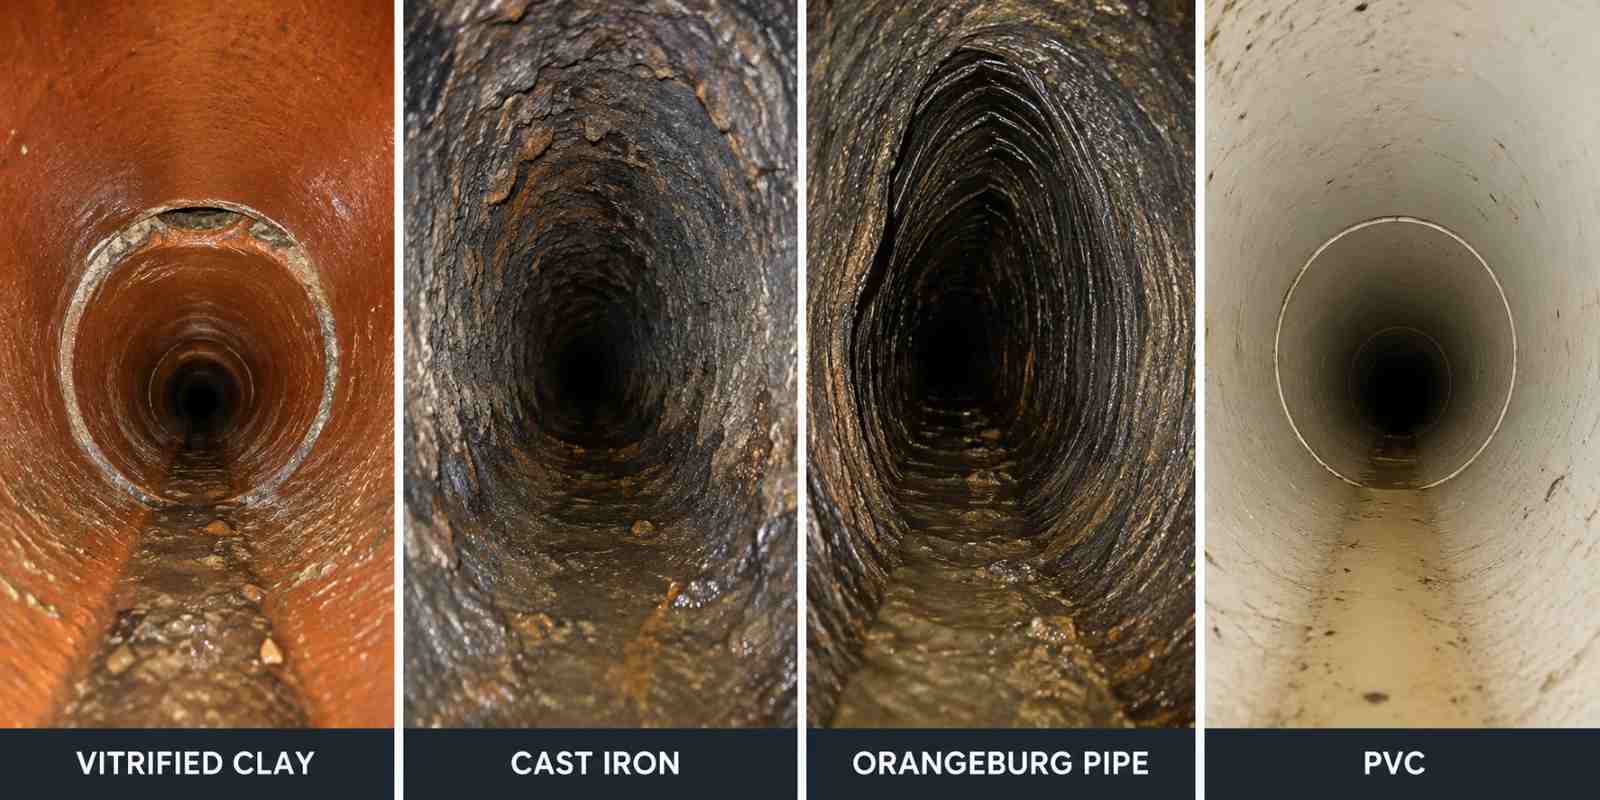
| Material | How it reads on camera | Characteristic failure mode | Typical residential era |
|---|---|---|---|
| Vitrified clay | Short sections with a visible joint every few feet, glazed reddish-brown wall | Root intrusion and offset joints at the frequent seams | Late 1800s to mid-1900s |
| Cast iron | Dark metal wall, smooth when new, rough and flaking when corroded | Internal corrosion, scale buildup, and channeling along the bottom | Early to mid-1900s into the 1970s |
| Orangeburg | Dark, layered wall like tar-soaked cardboard; often deformed to an oval. Bituminous fiber, essentially tar-impregnated wood pulp | Deformation, blistering, and full collapse as the fiber softens; 30 to 50 year design life, so every remaining lateral is at or past end of life | 1940s into the early 1970s |
| PVC | Smooth white or cream wall, long sections with few joints | Rare; usually joint separation or crushing from ground movement | 1970s to present |
| ABS | Smooth black wall, long sections, glued joints | Rare; joint failure or cracking in older cold-climate installs | 1970s to present |
Corrosion and scale are conditions a camera reads and a snake cannot. On a cast iron line, the feed shows internal rust roughening the wall and scale, a hard mineral crust, building up in ridges that narrow the channel the water has to pass through. A snake bores a hole through that buildup and restores flow for a while. The wall keeps corroding behind it.
Cast iron on a salt-air coast corrodes from the inside. That is where this matters on the Delmarva Peninsula. External moisture and coastal air attack the outside of buried metal, but the destructive corrosion in a sewer line works outward from the interior, where waste and moisture sit against the wall. No external or pressure test reaches that surface. Only a camera does. As the internal diameter narrows from scale and rust, the line drains slower and slower. That chronic whole-house sluggishness is what a snaking briefly clears and never fixes, because the lost diameter is gone for good.
Why Delmarva Conditions Make Video Inspection Especially Valuable
The Delmarva Peninsula’s high water table and sandy, shifting soil create two problems a physical test can confirm but never locate: groundwater infiltrating a line through joints and cracks, and lines that settle into bellies and offset joints over time. A pressure test can tell you groundwater is getting into the pipe. It stops there. What it cannot do is point to the joint or the crack where the water enters, and on a coast where the water table sits close to the surface, that gap decides the entire repair.
The Delaware Coastal Plain sits on shallow, sandy, water-bearing ground, so a cracked or separated joint below the water table is not just leaking outward, it is taking groundwater in. A camera run pinpoints that entry on the live feed and marks its depth. That is the difference between sealing one identified joint and digging up a full run to find the leak by trial and error. The camera removes that. Knowing the entry point sits at a marked distance down the line is what keeps the repair to a single excavation.
Sandy coastal soil is loose, and loose ground moves. Across Sussex County and the wider peninsula, the dominant soils are sandy through the profile, the kind of ground that shifts and settles under a buried pipe rather than holding it in place. As the soil settles unevenly, a lateral loses its steady slope and drops into a belly, or its joints pull sideways into offsets, the two defects that turn a functioning line into one that backs up on a cycle. The camera shows the settled section directly, the pooled water in the sag or the misaligned joint, so the diagnosis matches the ground it happened in.
Septic changes the calculation further inland. Much of inland Sussex County runs on on-site septic rather than public sewer, which means the critical pipe is the lateral running from the house to the tank, buried across a yard of that same shifting sand. A home inspector who runs the fixtures never sees that run, and a fixture check stops at the drain. A camera fed down the lateral shows its full length between house and tank, the one stretch of pipe most exposed to settling and root entry and least visible by any other method.
When Do You Need a Video Inspection, Not Just a Clearing?
Get a video inspection when a line backs up again within days or weeks of clearing, when slow drainage hits the whole house instead of one fixture, before buying a property whose sewer line a standard inspection skips, and before authorizing any excavation. A clearing solves a clog. A camera tells you whether the clog was the problem or just the symptom. These are the situations where that difference is worth confirming before you spend money on either a repeat clearing or a dig:
- A line that backs up again within days or weeks of being cleared. Fast recurrence means the cause is structural or a belly, not the debris that came out.
- Slow drainage across the whole house, not one fixture. A whole-house symptom points at the shared main or lateral; a single slow sink usually does not.
- Before buying a property, especially one built before the 1980s. A standard home inspection skips the sewer line, so its condition stays unknown until someone scopes it.
- Before any excavation. A camera marks the exact defect and its depth, so the dig targets one spot instead of chasing the line.
- Not for a single stopped fixture with no other symptoms. One clogged toilet while the rest of the house drains fine is a fixture clog, and clearing it is the right first step.
The one that surprises buyers is the home inspection gap. A standard home inspection runs the fixtures and confirms water drains, but it does not send a camera down the sewer line, a limit the home-inspection standards bodies state directly. On a property built before modern PVC, that unscoped lateral is the single most expensive unknown on the parcel, and a scope is the only way to price it before closing.
What Should a Video Inspection Report Include?
A proper report includes the recorded footage, distance-marked defect locations with their depth, the pipe material and its condition, and a specific recommended action. A verbal “you’ve got roots” after the truck leaves is not a report. The point of the deliverable is that someone else can verify the finding, so a defensible report contains four things:
- The recorded video footage. The full run, so the finding can be reviewed rather than taken on the technician’s word.
- Distance-marked and depth-marked defect locations. Each defect logged at its footage down the line and its depth below grade, not described vaguely.
- The pipe material and its condition. What the line is made of and how worn, which sets whether the fix is a repair or a replacement.
- A specific recommended action. A named next step tied to the findings, not a generic “monitor it” or an immediate upsell.
Coded documentation is what makes one company’s report comparable to another’s and usable in a repair bid or a real-estate negotiation. That coding follows a North American standard: NASSCO’s Pipeline Assessment Certification Program (PACP) governs condition coding for sewer mains, and its Lateral Assessment Certification Program (LACP) does the same for the residential service laterals that run from a house to the main or septic tank. A report built on that standard means a defect gets the same code from any certified inspector, so the finding holds up when a second opinion or a buyer’s agent reads it. That standardized severity code is not paperwork for its own sake: it is what turns the footage into the decision of whether the line gets maintained, spot-repaired, or replaced.
What Are Your Repair Options After a Video Inspection Finds a Problem?
What the camera finds determines the fix. An isolated crack or a root intrusion at one joint may allow a spot repair or a trenchless lining; a full-length line that is degraded but still holding its shape may take pipe bursting; and a collapse or a belly forces open-trench excavation. The finding maps to the method:
| What the camera finds | Matched repair | Why this method |
|---|---|---|
| An isolated crack or root intrusion at a single joint | Spot repair or a short CIPP liner | A localized defect can be sealed or lined without touching the rest of the line. CIPP means cured-in-place pipe, a resin liner hardened inside the old pipe to form a new one |
| A full-length line that is worn or root-prone but still holds its shape | Full-length CIPP lining | The host pipe has enough structure left to line against, so a new pipe forms inside it with no trench |
| A degraded line too far gone to line, but on a diggable path | Pipe bursting | A bursting head fractures the old pipe outward and pulls a new pipe into its path, replacing a line a liner could never bond to. On the peninsula’s loose sandy soil it needs a site check first, since bursting shifts the surrounding ground more than lining does |
| A collapse or a bellied section | Open-trench excavation and re-grading | A caved or sagging pipe cannot be lined or burst; the run has to be dug up, replaced, and re-graded to restore slope |
The camera is what makes that match possible, and it works at both ends of the job. Before any repair, the inspection scopes the correct method: it tells the plumber whether the pipe still has the structure to line, whether bursting fits the path, or whether the damage forces a dig. That is the difference between a quoted repair and a guessed one.
After the work, the same camera confirms it. A second run shows the new liner seated against the wall, the burst line pulled through clean, or the re-graded section holding its slope. A physical-only approach never closes that loop, because a snake can tell you the line drains again but not whether the repair was done right. The camera can show both.